
MicroMaking: Introduction to Micro:bit and 3 SUPER EASY Micro:bit Projects for Grades 3-6
- Helen Kardiasmenos
- Aug 31, 2019
- 3 min read

This blog post explores the Microbit and examines 3 super easy Micro:bit projects (for beginniers) that would suit student learning in grades 3-6. This post refers back to the NSW syllabus outcomes generally and specifically the three digital technologies outcomes (2DPT, 3DPT and 11DIT) in the K-6 Science and Technology syllabus, however these can be easily adapted for other curriculum documents in Australia or around the world.
What it the Micro:bit?
The Micro:bit is an easy to use microcomputer designed for students to create and explore computational thinking, algorithms, design thinking and digital systems.
How to code the Micro:bit?
The Micro:bit can be coded on Microsofts MakeCode Website or via the free app which can be downloaded from your devices App Store.


How to download code to the Micro:bit?
The Micro:bit code can be downloaded from your device to the microbit in two ways.
1. It can be downloaded uisng the Micro USB port and cable, connecting your microbit with your device.
2. It can be downloaded via Bluetooth once you Pair your device with your Micro:bit.


Parts of the Micro:bit?
There are a number of super awesome features of the micro:bit that lend themselves as versatile for different projects. These features can be coded to do different things and create different outputs. The table below outlines some of the features and functions of the Micro:bits.


3 SUPER EASY Micro:bit Projects
1. Micro:bit Pets, Animals or Story Characters
In this project students will create a Micropet or Animal which can be linked to a unit or work or a story being explored.


There are a variety of codes that can be used here depending on your text on what animal or characters you are planning or making.
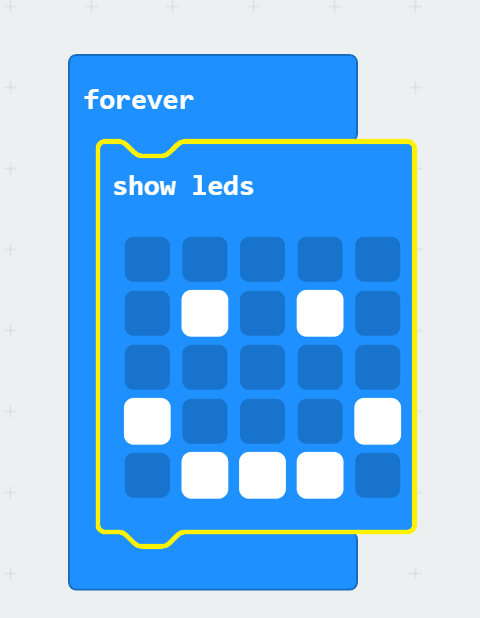
In example 1:
Input = Forever Show
Output = Smiley Face on LED lights
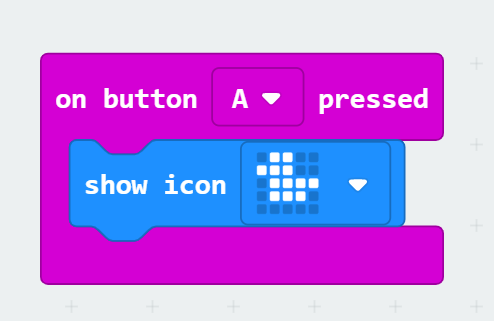
In example 2:
Input = When Button A is pressed
Output = Smiley Animal Icon on LED lights
An extension of this project for Year 5 and 6 (Stage 3) and Years 7 to 8 (Stage 4) would be to write this code in Python or text code.
From microbit import *
while True:
if button_a.is_pressed():
display.show(Image.HAPPY)
elif button_b.is_pressed():
display.show(Image.SILLY)
else:
display.show(Image.GIRAFFE)
Another more specific example would be creating a character from a text. Here we are going to create the Playing Cards from Lewis Carrols Alice in Wonderland.


Input = On logo up or down
Output = Spade or Heart
2. Micro:bit Temperature Sensor
The Micro:bit Temperature Sensor is like a theromoter and uses the sensors on the Micro:bit to show the temperature reading of a space. This is a project that can be made across grades 3-6 or even earlier as the study of weather and climate is evident across a number of grades in both Science and Geography.


On Start = When Micro:bit starts show Umbrella
Input = When Button A is pressed
Output = Show Number
Condition = Number shown in Temperature
Extension or Curriculum Links
Graph results & enter data into a spreadsheet
Measure temperature in differfent locations or times of day does this change the reading why?
Apply heat to processor (Does reading increase)
Apply to cooler areas, Does the reading decrease? why?
3. Micro:bit Dice

This project is the perfect problem-solving activity and integration tool for teaching and learning about maths and statistics. In this project, students can code and create an electronic dice using the micro:bit. The dice is fairly easy to make and can be independently made by students in year 3 or those new to block coding. However a more complicated version can be made as a next steps or extension activity, and for students in years 5 and 6 as a means of modifying an algorithm or program.
Dice Version 1 (Super Easy - Yr 3/Beginners)

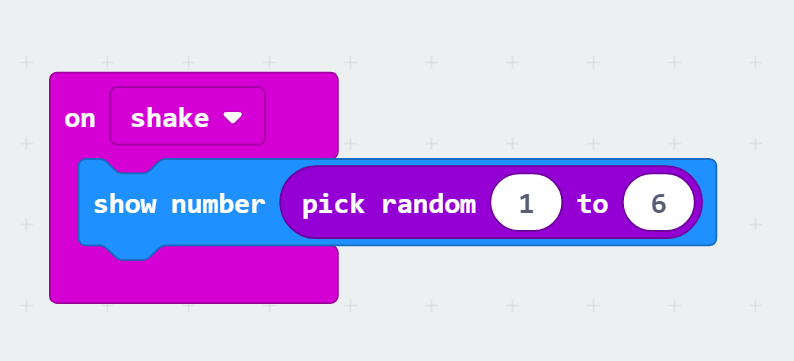
In version 1, students create a dice that shows on a number on the LED lights.
This version contains 3 blocks:
Input = On Shake
Output = Show Number
Randon = Condition (Type of Number)
Dice Version 2 (Easy/Medium - Yr 5-6 /More Advanced)
In this Version students will create a more advanced dice using if/else blocks to code hie dice to show pictures or subitizing versions of the dice. In this version students would need to create a Variable called 'Roll' (this is what is going to change with every shake) depending on which


Input = On Shake
Variable = Roll
If/Else = Conditional statement runing different statements depending on 'Roll'
Output = Show Number using dot pattern based on roll
Randon = Condition (Type of Number)


Extension or Curriculum Links


There are loads of other project ideas and tutorials on Makecode
CSER Moocs and PL in a box programs are also a great resource for teaching Digital Technologies concepts and ideas K-12.
For more information, ideas or to book Professional Learning for your school contact me - Helen Kardiasmenos
Comments